需要用到的

  • 一台 vps 服务器
  • Terraform
  • oci-cli

一、安装 Terraform

wget https://releases.hashicorp.com/terraform/0.15.5/terraform\_0.15.5\_linux\_amd64.zip

解压,并移动文件 terraform 到 /usr/bin 目录

unzip terraform\_0.15.5\_linux\_amd64.zip  
mv terraform /usr/bin

使用以下命令查看版本

terraform version

显示如下则安装成功

image-20220325192635053

二、安装 oci-cli 工具

使用以下命令安装 oci-cli 工具

bash -c "$(curl –L https://raw.githubusercontent.com/oracle/oci-cli/master/scripts/install/install.sh)"

一直回车即可
当出现:

image-20220325192726043

这个时候,是在提示你输入 y 回车,会自动添加环境变量
之后又是一直回车。出现如下提示表示安装成功。可以用:oci -v 查询版本

image-20220325192805387

三、复制用户和租户的 ocid

甲骨文后台右上角 — 用户设置 — 点击用户以及租户,在信息栏中有我们需要的 ID,分别点击复制,可以保存在记事本备份好

image-20220325192841994

image-20220325192904724

四、配置 cli

输入如下代码开始配置,配置的路径默认在 root 目录

oci setup config  

具体配置看下面

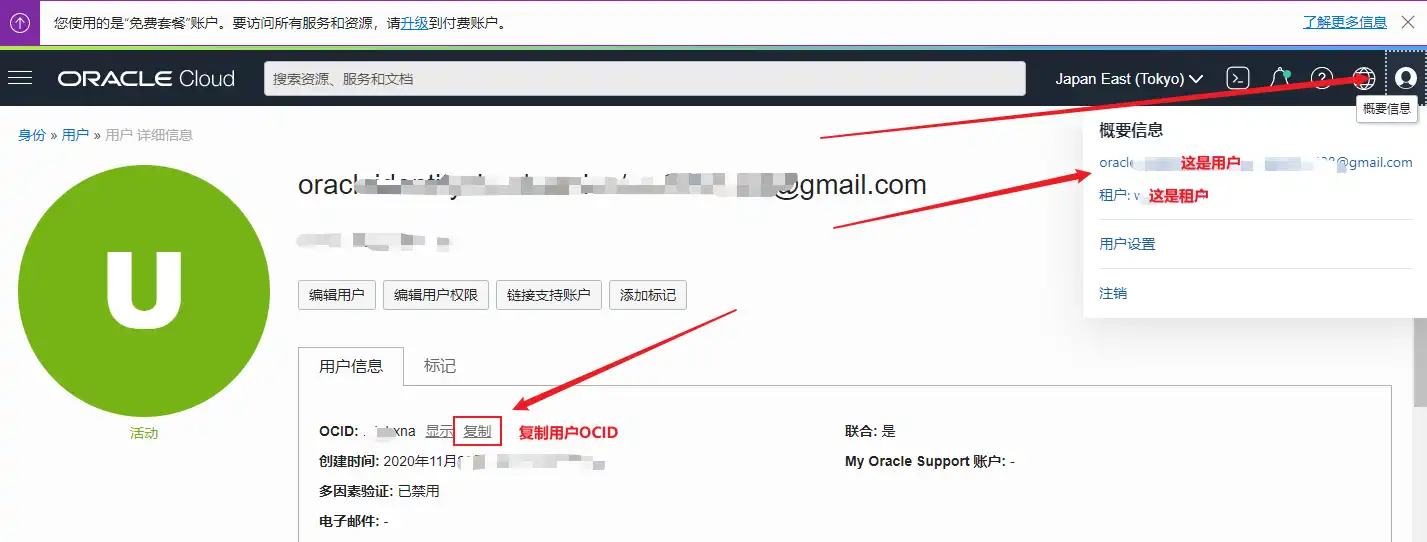
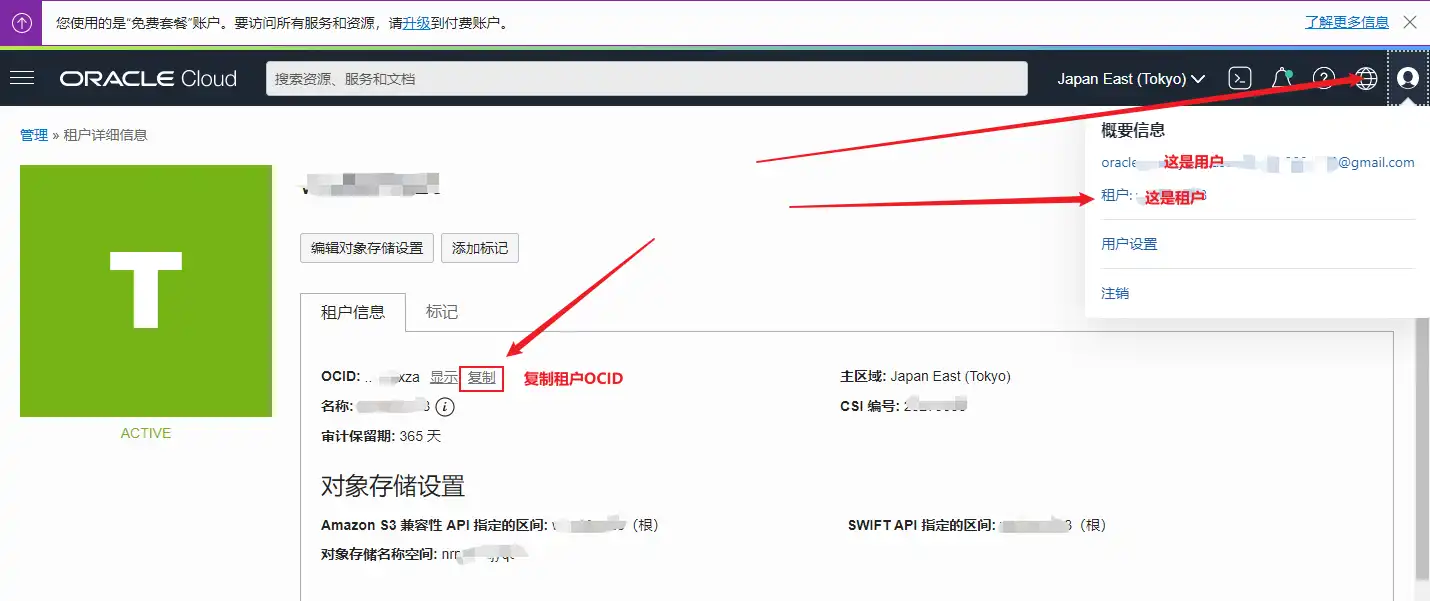
Enter a location for your config \[/root/.oci/config\]:   
Enter a user OCID: #输入你的用户OCID
Enter a tenancy OCID: #输入你的租户OCID
Enter a region by index or name(e.g.
1: ap-chiyoda-1, 2: ap-chuncheon-1, 3: ap-hyderabad-1, 4: ap-melbourne-1, 5: ap-mumbai-1,6: ap-osaka-1, 7: ap-seoul-1, 8: ap-sydney-1, 9: ap-tokyo-1, 10: ca-montreal-1,11: ca-toronto-1, 12: eu-amsterdam-1, 13: eu-frankfurt-1, 14: eu-zurich-1, 15: me-dubai-1,16: me-jeddah-1, 17: sa-santiago-1, 18: sa-saopaulo-1, 19: uk-cardiff-1, 20: uk-gov-cardiff-1,21: uk-gov-london-1, 22: uk-london-1, 23: us-ashburn-1, 24: us-gov-ashburn-1, 25: us-gov-chicago-1,26: us-gov-phoenix-1, 27: us-langley-1, 28: us-luke-1, 29: us-phoenix-1,30: us-sanjose-1): 9 #这里选择你的区域
Do you want to generate a new API Signing RSA key pair? (If you decline you will be asked to supply the path to an existing key.) \[Y/n\]: y #输入y生成公钥
Enter a directory for your keys to be created \[/root/.oci\]:
Enter a name for your key \[oci\_api\_key\]:
Public key written to: /root/.oci/oci\_api\_key\_public.pem
Enter a passphrase for your private key (empty for no passphrase):
Private key written to: /root/.oci/oci\_api\_key.pem
Fingerprint:
Config written to /root/.oci/config

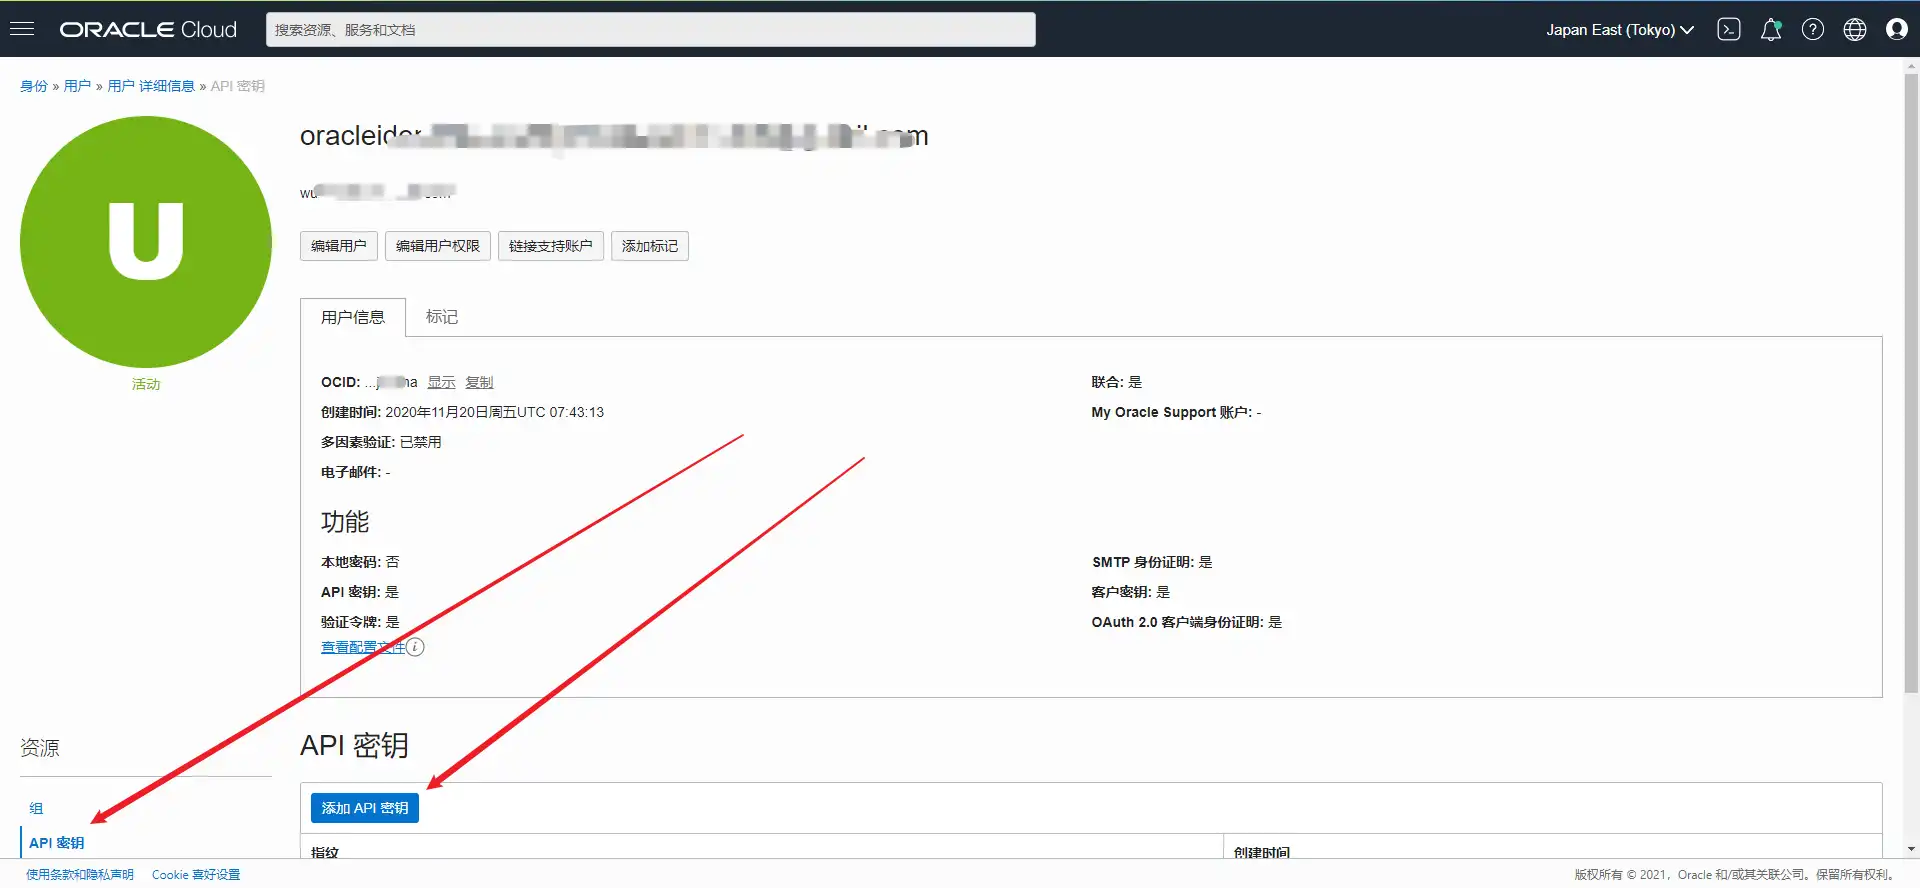
If you haven't already uploaded your API Signing public key through the
console, follow the instructions on the page linked below in the section
'How to upload the public key':

https://docs.cloud.oracle.com/Content/API/Concepts/apisigningkey.htm#How2

复制生成的公钥,使用以下命令获取公钥

cat /root/.oci/oci\_api\_key\_public.pem

把显示出来的内容复制,并且添加到
甲骨文后台 — 用户设置 — 资源 —API 秘钥 — 添加 API 秘钥

image-20220325192928930

oci iam availability-domain list

提示以下内容则是配置正确

image-20220325193030333

五、Terraform 环境初始化

1、我们先获取甲骨文的 Terraform 脚本

点击 创建 VM 实例

image-20220325193049208

image-1623397155148

image-20220325193216499

一直下一步

image-20220325193247933

image-20220325193323550

image-20220325193345709

2、配置 Terraform

使用以下命令创建 Terraform 运行目录

cd /opt/
mkdir terraform-learning && cd terraform-learning

将刚刚解压到桌面的 main.tf 文件 上传到这个目录

image-20220325193405305

将目录设置为 Terraform 运行目录

terraform init

以上完成后,开始创建任务,用命令:(注意还是在 /opt/terraform-learning)

terraform apply

执行完上面命令之后,会提示输入 yes

image-20220325193426935

上图还能看到 API 返回 Error Message: Out of host capacity, 提示主机容量不足,下面就用脚本来不停刷就行了

六、部署脚本

终于可以部署脚本来抢服务器了,请先获取 telegram 账号 id,并且关注通知机器人 @oracle_message_bot
TG id 请通过 @userinfobot 机器人获取
在 root 目录下新建一个 terraform.sh

cd /root  
vi terraform.sh

写入以下内容

#!/bin/bash

path='/opt/terraform-learning/'
FIND_FILE="/root/terraform.log" #日志文件位置
FIND_STR="Apply complete!"
cd $path &&
while true
do
echo 'yes' | terraform apply -lock=false
sleep 1s
if [ `grep -c "$FIND_STR" $FIND_FILE` -ne '0' ];then
# tg通知并停止
curl --location --request POST 'https://api.telegram.org/bot2041773532:AAHv_glHg4eHFhyQBD7kZp1qhheYP4nmeI8/sendMessage' \
--form 'text=服务器创建成功!' \
--form 'chat_id=你的tg id' \
--form 'parse_mode=markdown'
exit 0
fi
done

ps: HM的脚本并不可用,所以我对脚本进行了修改

给 Shell 脚本赋予执行权限:

chmod +x terraform.sh

使用以下命令后台执行脚本

nohup ./terraform.sh >> terraform.log 2>&1 &

如何结束脚本?

使用以下命令结束脚本

pkill terraform

转载自 HM 的博客 https://him.plus/archives/274